


How to use OneDrive and SharePoint on Mac devices
- Krissh
- Feb 19, 2021
- 4 min read
Updated: Dec 3, 2022
Both, Microsoft OneDrive and SharePoint are used for cloud-based storage. Most of the organizations currently have Office365 subscriptions, and as part of these subscriptions, they utilize OneDrive & SharePoint for cloud-based storage. Undoubtedly, cloud storage provides much-needed flexibility. One can access their files on the go, at their convenience without even relying on a physical drive. Moreover, data stored on cloud storage is safe from physical hardware failure. This means very minimal chances of data loss. The best part is, both of these tools are available on the Mac platform. These tools can be set up on all the devices supported by Mac OS, that includes iMac, MacBook, and Mac Mini. However, before we go into details, we need to know how that Sharepoint is not an app as most of the user thinks. It is just the business variant of OneDrive. At the same time, OneDrive is an application program that is used for syncing the files on the computer and the cloud.
Installing OneDrive
Even before we start with the installation, let's look at some of the pre-requisites.
MS Office license is required to set up SharePoint. This can be an office 365 license, Business Premium, or Enterprise license.
You should have Office 365 personal, Home, or a version higher than that. (All these versions will have the OneDrive app)
Your MAC version should be Mac OS X 10.12 (Sierra) or a later version.
It must be noted that Office 2011 will not have the OneDrive app, and that is why it is not supported. All the files that are stored on the SharePoint drive, can be accessed only by the OneDrive app.
Once we have ensured that our pre-requisites are met, let's start with the following steps:
Download the OneDrive App from the link given below.

· We can install the app from the app store, by clicking on the icon for AppStore. Search for OneDrive in the search box.
· Once the executable file is downloaded, launch the executable file and complete the installation wizard.
Setting up OneDrive on Mac
· Launch the OneDrive application.
· Enter your email address on the sign-in screen, and click on “Sign In”.
· On the next page, select whether it’s a personal email ID or a corporate email ID.
· On the next screen, sign in to the Office365. Ensure that you are using the same email address, which is subscribed to Office365.


· In the next step, you will be prompted to authenticate with an ID provided by your organization. It can be a single factor authentication or 2-Factor authentication.
· Post authentication, you will be successfully logged into the OneDrive application. It will prompt you to select the folder that will be synced to OneDrive. The selected folder will exist on the Mac device, as well as it can be accessed from any other device.


· In the next step select the location for the OneDrive folder and click on the option “Choose this location”. As soon as this location is selected, OneDrive will automatically create a folder with the name that was selected earlier. This is where the files are going to be synced. When OneDrive is opened from another system or device, one can navigate to this folder, and access all the stored files.
· In the next step specify whether all the files & folders will be downloaded to the OneDrive folder, or it will be specific folders. An important tip here will be to select only those folders which are important, rather than selecting all of them. This would save space on the OneDrive.


· Your OneDrive is ready for use, and that will be displayed on the screen. An important tip here will select the option “Open at login so my files sync automatically”. This will ensure that file sync starts as soon as you login into your Mac device.
· Now select the synced folders, it will display its contents as synced from the Mac device.
Changing the preferences
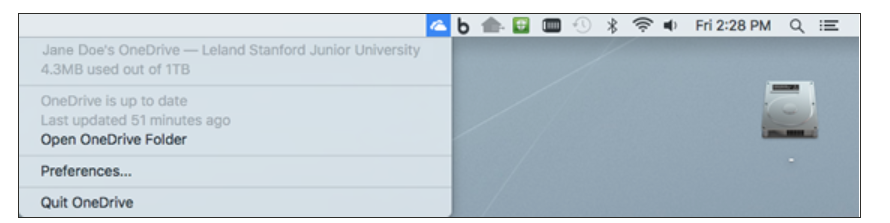
Often after installing and configuring the OneDrive, we might have to change the preferences. This can be easily done by right-clicking on the OneDrive icon on the taskbar and then selecting “Preferences”.
Some of the key things that can be done from preferences are:
· Add accounts.
· Unlink Accounts.
· Add or remove folders.
· Check storage status.


Sync SharePoint files
As it has been mentioned there is no app for SharePoint, so we have to login through the available links. There are three ways to login to SharePoint.
· https://account.microsoft.com/account
· https://login.microsoftonline.com/
· https://your-sharepoint-name.sharepoint.com (Company SharePoint Account)
Once you login to the Office 365 site, from app widgets you will find both OneDrive and SharePoint listed. You can open either of them, based on your requirements. Now click on the sync icon to start syncing.
As soon as the sync option is clicked, it will open OneDrive installed on the Mac device, since SharePoint uses OneDrive app for syncing. Once the OneDrive app is opened, you can select the files and folders, that are required to be synced. While the sync happens, you will find the OneDrive icon in an animated state. It will be in the same state till the sync is over.


Now if you want to see the synced items of your SharePoint folder, just right click on the OneDrive icon on the taskbar, and select the specified drive.
When should you use OneDrive and Sharepoint?
You might be wondering, that both of these options are cloud repositories that can store files or data. So, when should be we use them? This can be answered in a very simple way. If you are storing your files and folders, then OneDrive is the option for you. In OneDrive only the owner or the user has got access to the stored files. However, users can explicitly share it with others. Sharepoint is primarily for corporate or office usage, where the files are required to be shared with other team members or colleagues. In this case, the SharePoint administrator will regulate the access and permissions to the files & folders stored on the Sharepoint folder. No matter you are using Sharepoint, its file on the Mac device can be accessed only with the help of the OneDrive application.


Comments